I spend a lot of time write and debugging command line scripts and programs. As much as I like looking at large numbers (millions, billions, trillions, etc) it can be difficult to read a big number and quickly parse how large it is, i.e. “is that 12 megabytes or 1.2 gigabytes?”.

A long time ago I wrote a small function that does pretty printing of a number of bytes. It can handle from bytes to exabytes, and properly handles integer numbers of a unit by printing it as an integer instead of float. Should be easy enough to adjust to your specific needs or style desires.

// Prints to the provided buffer a nice number of bytes (KB, MB, GB, etc)
void pretty_bytes(char* buf, uint bytes)
{
    const char* suffixes[7];
    suffixes[0] = "B";
    suffixes[1] = "KB";
    suffixes[2] = "MB";
    suffixes[3] = "GB";
    suffixes[4] = "TB";
    suffixes[5] = "PB";
    suffixes[6] = "EB";
    uint s = 0; // which suffix to use
    double count = bytes;
    while (count >= 1024 && s < 7)
    {
        s++;
        count /= 1024;
    }
    if (count - floor(count) == 0.0)
        sprintf(buf, "%d %s", (int)count, suffixes[s]);
    else
        sprintf(buf, "%.1f %s", count, suffixes[s]);
}

SQLite is a pretty neat single-file database engine. In their own words,

SQLite is a software library that implements a self-contained, serverless, zero-configuration, transactional SQL database engine. SQLite is the most widely deployed SQL database engine in the world. The source code for SQLite is in the public domain.

There are SQLite libraries and interfaces available for pretty much any software language, but they also include sqlite3, which is “a terminal-based front-end to the SQLite library that can evaluate queries interactively and display the results in multiple formats. sqlite3 can also be used within shell scripts and other applications to provide batch processing features.”

If you have experience writing SQL queries, it’s easy to get started with the SQLite interface. A few non-standard commands that will help you get started are .tables , which lists the names of all tables in the current database, and .schema tablename which describes the schema of the named table. From there, you can use traditional SQL queries to add, modify, and delete rows in your tables. Have fun!

Note: Be sure to do a backup of your database file before mucking about with the sqlite3 interface, sometimes the program crashes, or you might type a dangerous command or something like that.

As part of my work with Wayne and Layne, Adam and I do a lot of work together remotely, since I live in Pennsylvania and he lives in Minnesota. It’s really nice to be able to quickly share a work in progress, whether it be a diagram in Inkscape or a printed circuit board layout in Kicad. Setting up a Skype or other screen sharing system incurs too much transaction cost and isn’t very quick, so I was looking for something quicker and simpler.

I wrote this little script to take a screenshot of my entire display, add a timestamp to the bottom, and automatically upload it to my website. I set up an SSH key between my computer and my webserver (that is unlocked when I login), and added the following script to my path as screenshot_poster.sh

#!/bin/bash
#
# This script will capture the whole screen
# and upload it to the web in a known location
# Written by Matthew Beckler for Wayne and Layne, LLC
# Last updated August 31, 2012

cd /tmp
import -window root temp.png
WIDTH=`identify -format %w temp.png`
DATE=`date`
convert -background '#0008' -fill white -gravity west -size ${WIDTH}x30 caption:"$DATE" temp.png +swap -gravity south -composite screenshot.png
scp screenshot.png user@example.com:/var/www/rest/of/the/path/to/screenshot.png

DEST="http://example.com/path/to/screenshot.png"
# do you want a notification or to just open the browser?
#notify-send -t 1000 "Screenshot posted" "$DEST"
xdg-open "$DEST"

The final two lines allow you to make a little desktop notification of the URL, open a web browser to the image’s location, or both. Someday I will set up a nice keyboard shortcut to run this script, to make the process of sharing my work-in-progress as quick and easy as possible.

screenshot

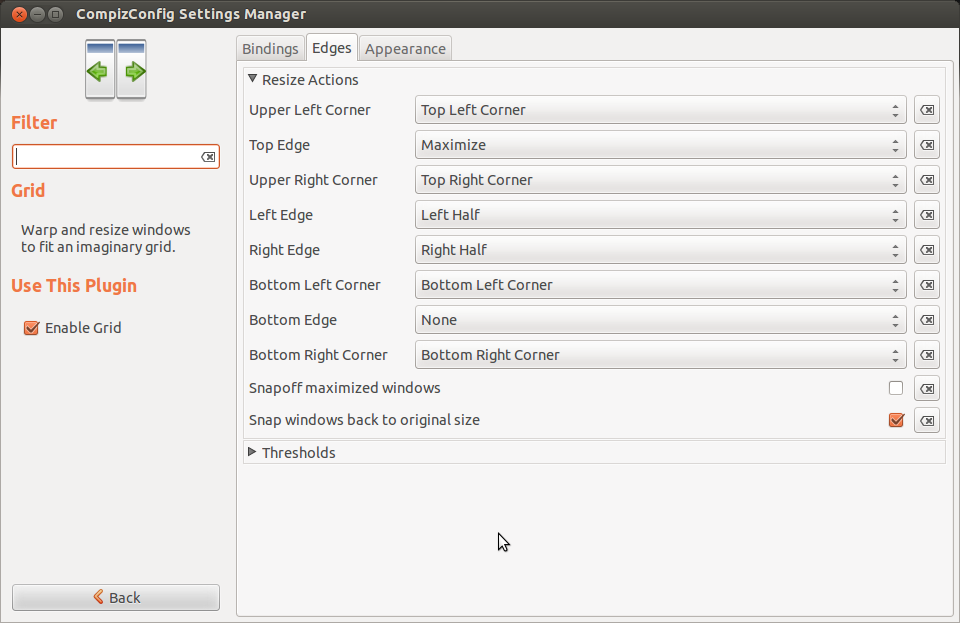
I really enjoy the new feature in recent versions of Ubuntu, where I can drag a window to the top, left, or right edge of a display to resize the window to take up the full area, the left half, or the right half, respectively, of the display. For my 27″ external display, however, I thought it would be nice to make the display corners into drop target that would resize the window to occupy just a corner of the display. Turns out that this functionality is already built-in to the Compiz plugin called “Grid”. You just have to tweak a few settings to enable it.

compizconfit_settings_manager_grid

To access the right settings, you must first install the CompizConfig Settings Manager, so go to the Ubuntu software center and search for that package. Once you’ve installed it, search for the same name from the launcher to start it up. Heed well the warning about seriously messing up your desktop. Click on “Window Management” from the category list on the left side, and then select “Grid”. Select the “Edges” tab, and expand “Resize Actions”. Change the drop-down options for the four corner items to match the corner, as shown in the screenshot above. Now, you can drag a window to the corner of a display to have it resize to fill that quarter of the screen, as shown below.

corner_window_resize

It doesn’t work 100% perfectly with multiple displays, having some troubles and inconsistent behavior with the “shared corners” but it works more than well enough for my needs.

Like all things Linux, there are a dozen ways to do anything, and dozens of how-to guides on how to do it wrong. System logging is no exception. Modern Ubuntu distributions use rsyslog, so this is a guide to setting up remote system logging between two modern Ubuntu machines.

System logging is the way that a computer deals with all the info and error messages generated by the kernel, drivers, and userland applications that should be saved in case they are useful, but aren’t generally immediately needed by the user. So generally the messages are sent to your locally-running rsyslog program, and saved to /var/log/syslog. Remote system logging is where one computer (computer Alpha) will send out all its system messages to a different computer (computer Beta), to be processed/stored there. This can be useful if computer Alpha (the log sender) is having hardware troubles and frequently crashing, making it nice to have a record of what happened in the final few seconds before the crash.

Changes on the log receiver (computer Beta)
Edit the file /etc/rsyslog.d/50-default.conf. Add these lines before any other non-commented lines in the file:
# let's put the messages from alpha into a specific file
$ModLoad imudp
$RuleSet remote
*.* /var/log/alpha.log
$InputUDPServerBindRuleset remote
$UDPServerRun 514
# switch back to default ruleset
$RuleSet RSYSLOG_DefaultRuleset

This loads the “imudp” module which allows us to run a UDP (not TCP) log receiving server. Then we set up a rule set that logs all logs to the file /var/log/alpha.log. We apply that rule set to the UDP server, and start the server on port 514. Then we switch back to the default ruleset, and the rest of the file tweaks that ruleset (where different types of messages end up).

To apply the change, run “sudo service rsyslog restart”. You can use netstat to check which ports have listeners:

sudo netstat -tlnup

Which should produce a line like this:

udp6 0 0 :::514 :::* 27102/rsyslogd

Changes on the log sender (computer Alpha)
Edit the file /etc/rsyslog.d/50-default.conf. Add these lines before any other non-commented lines in the file:
# log all messages to this rsyslogd host
*.* @1.2.3.4:514

This tells rsyslog to send all messages (*.*) to the specified IP address via port 514. To apply the change, run “sudo service rsyslog restart”.

Test it out!
On the log receiver (computer Beta) run this command to watch the log file from alpha:

sudo tail -f /var/log/alpha.log

On the log sender (computer Alpha) run this command to put a silly message into the system log system:

logger Hello World

You should see something like this show up in the terminal on the log receiver:

Jan 10 17:56:53 alpha eceuser: Hello World

TCP instead of UDP
I initially tried to set up the log receiver to listed on a TCP port instead of UDP, but it just wasn’t working, and I’m not sure why.
If you wanted to do TCP instead of UDP you would change the lines for the log receiver configuration, and then use two @@ instead of just one @ in the log sender configuration.

Neal Stephenson is one of my favorite authors. My favorites are Crypotnomicon and Snow Crash, but Diamond Age and Anathem were also great. REAMDE was fun and very much Stephenson’s style. One of my favorite passages is when Richard takes his brother and the MI6 spy Olivia to a local biker bar in Seattle.

“Is this a real blue-collar bar or a simulacrum thereof?” Olivia asked.
“Both,” Richard said. “It started out as a pure simulacrum, a few years ago, before the economy crashed, when it was hip for twentysomethings to move down here and dress in Carhartts and utili-kilts. But they did such a good job of it that actual blue-collar people began to show up. And then the economy did crash, and the hip people discovered that they were, in actual point of fact, blue collar, and probably always would be. So you’ve got guys here who run lathes. But they have colored Mohawks and college degrees, and they program the lathes in computer languages. I was trying to come up with a name for them. Cerulean-collar workers, maybe.”

GNU Screen is a really fantastic piece of software. Screen is a “terminal multiplexer”, that allows you to run and manage several terminal instances from a single terminal window. It’s sort of like how a graphical user interface lets you have multiple graphical application windows running at the same time, allowing you to switch between them at will. Screen is really great when working on a remote server over wifi or any unreliable network connection, as a dropped connection won’t kill off your jobs or close all your shells, you can simply reconnect to the screen instance when you reconnect.

Screen allows you to add a “caption” bar at the bottom of the screen, that sort of acts like a taskbar in a graphical interface. The behavior of the caption bar is controlled by the .screenrc file, and here is what my .screenrc file looks like:
defshell $SHELL
caption always '%{= dg} %H %{G}| %{B}%l %{G}|%=%?%{d}%-w%?%{r}(%{d}%n %t%? {%u} %?%{r})%{d}%?%+w%?%=%{G}| %{B}%M %d %c:%s '

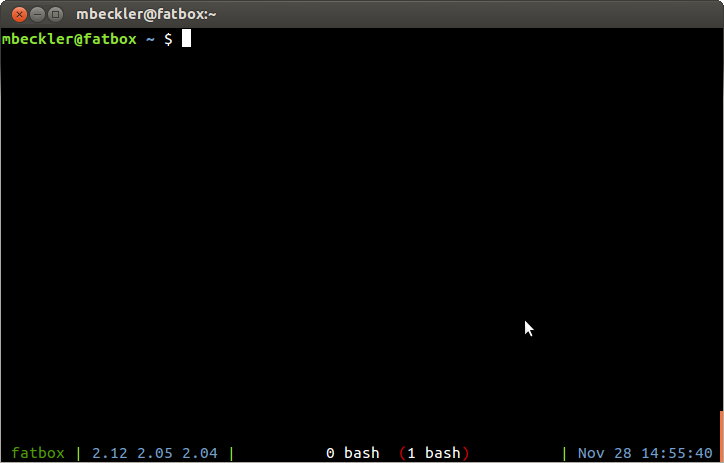
Here is a screenshot of what it looks like:

Basically, the bottom bar displays a bunch of information that you can remove from your prompt. On the left is the hostname (in case you are logged into multiple machines, you won’t get confused this way), then the system load values, and on the far right is the current date and time. The center of the bar is a “task bar” that shows the numbers and configurable names of all the sub-terminals you have in this screen session. (FYI, you can rename your screen session with Control-a A (capital A!), then backspace to remove the default name (usually the name of your shell) and it will update in the “task bar”.)

I used to have an ffmpeg command line that I used to video record a window on my linux desktop, but it stopped working a while ago and I didn’t want to dig into the man pages to figure it out all over again. So, I went looking online to try and see what other people had done.

The best solution I found is a little shell script with a tiny bit of GUI added via zenity. It is called Capture Me, and you can download it at that link. I haven’t ever tried it with capturing audio as well as video, but it will probably work too.

There’s no block comment (like /* comment */ in c) for Latex source, which is unfortunate. Someone once suggested defining a custom Latex command that did nothing, and use that as a comment tool. This has been working well for me for a few years:

\newcommand{\comment}[1]{}

Use it like this:

\comment{stuff
that
should
be
commented
out}

Here is how to set up a secured SFTP server where the user is not permitted shell access, nor access to any other part of the filesystem than what you allow with the chroot. I did this in September 2012 on Ubuntu 12.04.

First, I want to create a place for all the files to live:

sudo mkdir /data/

OpenSSH requires that the sftp user cannot have write access to the root directory, so you have to create at least one sub directory that can be owned by the sftp user:

sudo mkdir /data/incoming/

Second, we want to add a new user solely for this server:

sudo useradd --home-dir /data/incoming --no-create-home sftpuser

Change their password to something long and strong:

sudo passwd sftpupser

Give them control over the incoming directory so they can deposit files there:

sudo chown sftpuser:sftpuser /data/incoming/

Third, we need to enable SFTP in the SSHD configuration. Edit the file /etc/ssh/sshd_config and change the sftp line to this:

Subsystem sftp internal-sftp

Then add this chunk to the end of the file (make sure to put it after the “UsePAM” line!) :

Match User sftpuser
    ChrootDirectory /data
    AllowTCPForwarding no
    X11Forwarding no
    ForceCommand internal-sftp

Restart the SSH server with “sudo service ssh restart” and then you should be all set to go!